Thursday, March 1, 2018

Switching to Navigation Buttons Position inSamsung Galaxy S8


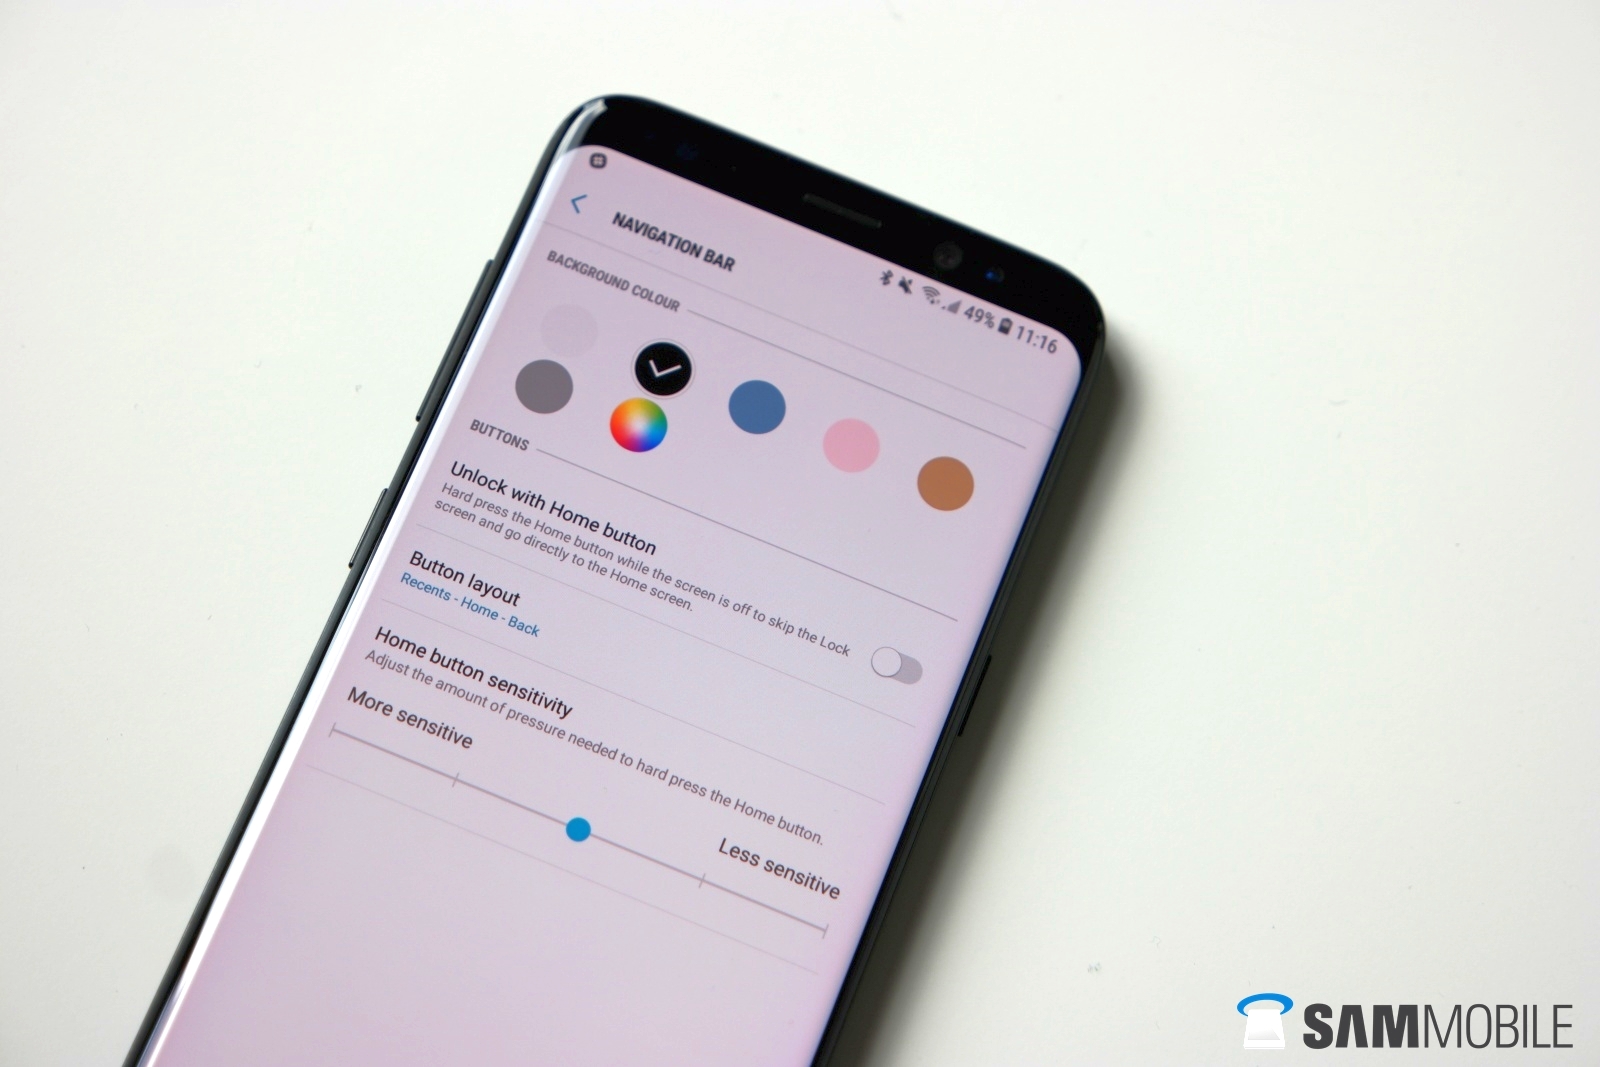
The navigation buttons in Samsung Galaxy S8 is now be the on-screen buttons and can be customised to suit your need, one of which is now you can swap the recents and back buttons position on the navigation bar. By default, the recents button is on the left side of the home button and the back button is on the right side. Swapping those two buttons position will help you use your Samsung Galaxy S8 with more easily especially if you have just come from or often switch with other phones that have different navigation buttons position.


How to switch the position of the navigation buttons?
As the example, we'll change the navigation buttons position from the default Recents-Home-Back to Back-Home-Recents by using the following steps:
  1. On any screen, swipe down the top of the screen to open up the notification panel and then tap to go to the settings menu.
  2. Tap Display.
  3. Scroll down the screen to find Navigation bar and then tap it.
  4. Tap Button layout and then select Back-Home-Recents.
  5. The navigation buttons position has been changed.

Settings of Home Button Pressure Sensitivity in Samsung Galaxy S8


The on-screen home button in your Samsung Galaxy S8 is pressure sensitive. When the unlock with home button feature is enabled, you can easily unlock the screen by hard pressing your finger on the home button when the screen is off. When needed, you can adjust this button pressure sensitivity to be more or less sensitive if it reacts too sensitive or too slow for you.

How to adjust the pressure sensitivity level of the home button?
You can do so by using the following steps:

  1. On any screen, swipe down the top of the screen to open up the notification panel and then tap to go to the settings menu.
  2. Tap Display.
Image result for How to adjust the pressure sensitivity level of the home button?
  1. Scroll down the screen to find Navigation bar and then tap it.
  2. Slide the bar in the Home button sensitivity section to the left for a more sensitive home button or to the right for a less sensitive home button. As a note, if you set the pressure sensitivity level to a less sensitive, you'll need to press the on-screen home button harder to have your phone recognises a hard press on this button.
  3. Image result for How to adjust the pressure sensitivity level of the home button?
  4. The amount of pressure needed to hard press the home button has been adjusted.

How to Fix Cannot Find Home Button on Standby Screen inSamsung Galaxy S8


By default, your Samsung Galaxy S8 will display the on-screen home button when the screen turns off for more convenient access. Since this button is always active, if you cannot find this button on the standby screen, you can still double tap or hard press the area where this button should be on the standby screen to easily turn on or unlock the screen if the unlock with home button feature is enabled. However, if you prefer to do those actions using the on-screen home button, you can set your phone to display this button on the standby screen by selecting the home button option on the always on display feature.


How to display the on-screen home button when the screen turns off?
You can do so by using the following steps:

  1. When the screen is on and unlocked, swipe down the top of the screen to open up the notification panel and then tap to go to the settings menu
  2. Image result for How to Fix Cannot Find Home Button on Standby Screen on Samsung Galaxy S8
  3. Scroll down the screen to find Lock screen and security and then tap it.
  4. Tap Always on display.
  5. If the always on display feature is off, tap the ON/OFF switch to turn it on. The switch turns when it's enabled.
  6. Tap Content to show and then select either Home button and clock or information or Home button only.
    As a note, if you select the Home button and clock or information option, you can then select which clock or information style you want to show on the standby screen.
  7. Now, press the Power key to turn off the screen and go to the standby screen to see the on-screen home button.

Changing of Default Volume Key Control in Samsung Galaxy S8


By default, the default volume key control in your Samsung Galaxy S8 is set to ringtone, which means your phone will adjust the ringtone volume when you press the volume up key or the volume down key. If needed, you can set these keys to adjust the media volume by assigning the default volume key control to media.


How to set the default volume key control to media?
You can do so by using the following steps:

  1. On any screen, swipe down the top of the screen to open up the notification panel and then tap   to go to the settings menu.
  2. Tap Sounds and vibration.
  3. Tap Default volume key control and then select Media.
  4. Now, when you press the volume up or down keys, your phone will adjust the media volume.

Samsung Galaxy S8: How to Use Pin to Top Feature in Messages


If you have difficulty to find the message or conversation from an important contact in the Messages app because it's stacked up by other new messages from other contacts, you can use the pin to top feature in your Samsung Galaxy S8 to pin important conversations so it will stay on top of the conversations list for easier access. If you ever use an older Samsung Galaxy S series, you'll notice that this feature has similar function with the priority senders feature because both these features let you easily access to your important conversations by placing them on top of the conversations list in the Messages app.


How to use the pin to top feature in the Messages app?
Method #1: From the conversations list
You can use this method to easily pin multiple conversations at once. To do so, do as follows:

  1. Open the Messages app.
  2. Long tap a conversation you wish to select and then single tap other conversations to make multiple selection.
  3. Tap Pin to top at the top right.
  4. The selected conversations have been pinned and will always stay on top of the conversations list even when you receive new messages from other contacts. A pinned conversation will be labelled with this icon .
Image result for How to use the pin to top feature in the Messages app?
Method #2: From within a conversation
You can use this method to easily pin the conversation from a contact whose message is currently displayed on the screen. To do so, do as follows:
  1. While you're opening or reading a message from a contact in the Messages app, tap at the top right and then tap Pin to top at the bottom right. This icon turns when it's enabled.
  2. The selected conversation has been pinned and will always stay on top of the conversations list even when you receive new messages from other contacts. A pinned conversation will be labelled with this icon .

Keeping Screen On While Using Your Phone in Android 7.0 in Samsung Galaxy S8


How to enable the smart stay feature?
You can turn on this feature by using the following steps:

  1. On any screen, swipe down the top of the screen to open up the notification panel and then tap to go to the settings menu.
  2. Tap Advanced features.
Image result for Keeping  Screen On While Using Your Phone in Android 7.0 in Samsung Galaxy S8
  1. Tap the ON/OFF switch next to Smart stay to enable or disable it. When the ON/OFF switch turns , means the smart stay feature is enabled.
Image result for Keeping  Screen On While Using Your Phone in Android 7.0 in Samsung Galaxy S8

As a note, since this feature works by utilising the front camera, make sure the camera can detect your face to make this feature works best by filling the following conditions:
  • Hold your phone upright and steady.
  • Use your phone in a well-lit environment but the screen is not in direct light.
  • The front camera is not being used by another app.


How to use the smart stay feature?
As the example, we'll use this feature to keep the screen on when reading a long-form article in a webpage by using the following steps:
  1. Open the Internet app and then open a webpage to read an article.
  2. While you're looking the screen to read the article, the front camera will check your face each time the screen timeout period is over. If it detects your face, the screen will stay on. If not, the screen will be turned off.

Saturday, January 7, 2017

Switching of Camera in Samsung Galaxy S3

You can customize some features embedded on Samsung Galaxy SIII camera through its settings, such as choosing shot mode that suit your needs, turn on or off flash option, switch default camera storage between phone or memory card, etc.

While you're on camera settings, you will see self portrait option available there. This option will allow you to change the camera from the back camera to the front-facing camera. By default, Self portrait option is set to Off which means it use the back camera.

How to change the back camera to the front-facing camera?
There are some shot modes available on Camera app which will result better if you use it for self portrait shot which means you need to use the front-facing camera to do so. To switch the camera, kindly follow the steps listed below:
  1. Go to Apps through Home screen.
  2. Tap Camera.
  3. Tap Settings(gear) icon to enter to the settings.
  4. Depending on your current settings, tap Self portrait to switch between the back camera and the front-facing camera. When it's OFF means it use the back camera, while if it's ON means it use the front-facing camera.

By knowing on how to switch between the back or front camera, now you can set it according to your need. If you want to use the back camera, then turn this option off. While to use the front camera, turn this option on. So, hope this helps :)

Swapping  Icons on Camera Settings

 Image result for Swapping  Icons on Camera Settings
Samsung Galaxy SIII comes with advanced camera equipped with some useful features inside it, such as several shot modes, swap default storage between phone and memory card, flash option, etc

You can find all these feature I've mentioned above on Camera app settings. The settings has several options, which may you don't use them all so to make you more easier accessing the most used option then you can change the shortcut position according to your needs.

How to rearrange shortcuts position on camera settings?
You can swap the icon on camera settings by using edit shortcut option . Here are the steps:
  1. Go to Apps through Home screen.
  2. Tap Camera.
  3. Tap Camera settings (gear) icon.
  4. Tap Edit shortcuts.
  5. Now you will see a menu with 15 shortcuts of camera settings that you can rearrange the position and pick four of them to be a quick settings . They are:
    • Self Portrait
    • Flash
    • Shooting Mode
    • Auto Focus
    • Scene Mode
    • Exposure Value
    • Time
    • Effects
    • Resolution
    • White Balance
    • ISO
    • Metering
    • Auto Contrast
    • Outdoor Visibility
    • Guidelines
  6. Tap and hold icon, then drag it to edit position of shortcuts. release to placed it.
  7. To change four quick settings that you use most, hold and drag the icon over one of the existing icon then release to place it.
Reordering the most used option on camera settings to the top list will make you more easier to access them without having to scroll. Also by setting four quick icon with the icon you need most will make you more easier accessing them without having entering the settings. So, have you ever tried to reorder option on the camera settings or changing four quick icon? Was it provide benefits for you?

Importing of  Contacts in VCF File from Internal Memory in Samsung Galaxy S3


In Samsung Galaxy SIII you can copy your contacts to your internal memory as .vcf file using export to USB storage option that you can find under Import/Export option on Contacts app.

Under Import/Export option, you will also see another option available there: import from USB storage. This option will allow you to import .vcf file on your internal memory to your contacts.

How to import contact from USB storage?
Below are the steps you need to do import .vcf file from internal memory to your contact:
  1. Go to Apps through Home screen.
  2. Tap Contacts.
  3. Tap the Contact tab.
  4. Tap the Menu key.
  5. On pop up menu select Import/Export.
  6. Tap Import from USB storage.
  7. Now you will see three options available on pop up menu, they are:
    • Import one vCard file: choose this option to import contact from one files.
    • Import multiple vCard files: choose this option to import contact from more than one .vcf files.
    • Import all vCard files: choose this option if you wants to import all .vcf files from the internal memory.
  8. Tap the required option. When the dot indicator next to the option shows green means the option is selected.
  9. Tap OK button.
  10. Select the desired vCard files you wish to import.
  11. Tap OK button to confirm importing contacts
By knowing how to import vCard files from the USB storage, now you will be able to import one, multiple or all .vcf file on your internal memory to your contact. Hope this helps :)

 Exporting of  Contacts to Internal Memory as VCF File

 Image result for Exporting of  Contacts to Internal Memory as VCF FileImage result for Exporting of  Contacts to Internal Memory as VCF File
There is a reason and condition that sometimes force you to copy your contacts from phone to SIM on your Galaxy SIII, such as when you want to send your phone for repair and you want to keep your contact by copying them into the SIM and use them in another phone.

In addition to copy contact from phone to SIM, here you can also copying contacts to your internal memory using export to USB storage option. The file will be a .vcf format that you can import to another phone or re-import it again to your Galaxy SIII.
Image result for How to export contacts to USB storage
How to export contacts to USB storage?
Follow the steps listed below to transfer contacts to your internal memory as .vcf file:
  1. Go to Apps through Home screen.
  2. Tap Contacts.
  3. Tap the Contact tab.
  4. Tap the Menu key.
  5. On pop up menu select Import/Export.
  6. Tap Export to USB storage.
  7. Tap OK button to confirm exporting contacts.

Exporting contacts as .vcf file to your internal memory will allow you to import it again later. This of course will useful if you wants to replace your SIM with the new ones but still wants to keep the contacts you've already have. So, hope this helps :)

Set Time Zone Manually Settings on Samsung Galaxy S3

 Image result for How to change time zone manually
As we have learn before that you can enable or disable Automatic time zone option on Samsung Galaxy SIII. Enabling this option will make your phone to use time zone provided by the network that you're currently using.


In addition to set time zone automatically, here is also an option which will allow you to change the time zone manually. But, first you need to turn off automatic time zone option before adjusting the time zone manually.
Image result for How to change time zone manually

How to change time zone manually?
If you want to adjust time zone to suit with your current location manually, then below are the steps to do:
  1. Go to Apps through Home screen.
  2. Tap Settings.
  3. Under System section, tap Date and time.
  4. If required, uncheck the checkbox next to Automatic time zone option to disable this option.
  5. Tap Select time zone.
  6. Now you will see a list of time zone.
  7. Tap the required time zone you wish to use.
  8. Tap Home button to return to the standby mode.

Knowing how to set time zone manually or automatically will make you have two choices that you can choose the one which is best suit your needs. So, which one you like the most? Set it automatically or manually?

Turn On or Off Automatic Time Zone

 Image result for Turn On or Off Automatic Time Zone  Image result for Turn On or Off Automatic Time Zone
In Samsung Galaxy SIII you can set the date and time manually to adjust it according to the date and time at your current location, or you can leave it by default to automatically set by the network that you're currently using.

Another option available on the Date and time page is Automatic time zone. Enabling this option will make your phone to use network-provided time zone, while disable it will allow you to set the time zone manually.

How to enable or disable Automatic time zone?
If you want to set time zone automatically or not, then below are the steps to do:
  1. Go to Settings.
  2. On System section, tap Date and time.
  3. Depending on your current settings, tap Automatic time zone to enable or disable this option. When the checkbox next to this option is ticked means the option is turned on.
  4. Tap Home button to return to the standby mode.
When you go to abroad, you may pass through the country with the different time zone. By enabling automatic time zone option in your phone, now you no need to change it manually due to the network will adjusting the time zone according to your current location and provide it on your phone. So, did you enable or disable this option on your phone?
  
Time Format Changing on Samsung Galaxy S3
 Image result for Time Format Changing on Samsung Galaxy S3
As we have learn before that you can easily change the date format in Samsung Galaxy SIII to the format you always have. You can choose one of three date format available on your phone to suit your need.


In addition to change the date format, while you're on the date and time page you can also change the phone's time format to use between 24-hour time format or AM/PM time format.
Image result for How to enable or disable use 24-hour format optionImage result for How to enable or disable use 24-hour format option
How to enable or disable use 24-hour format option?
Kindly follow the steps listed below to turn on or turn off this option:
1. Go to Apps through Home screen.
2. Tap Settings.
3. Scroll to System section, then tap Date and Time.
4. Depending on your current settings, tap Use 24-hour format to enable or disable this option. Enable this option to use 24 hour time format, or disable this option to use AM/PM time format. When the checkbox next to this option is ticked means the option is turned on.
5. Tap Home button to return to the standby mode.

Adjusting the time format on your phone to the format you usually use will make you more easier to read the time. So, what's the time format are you using now? 24-hour time format or AM/PM time format?

Changing of  Date Format on Samsung Galaxy S3

 Image result for Changing of  Date Format on Samsung Galaxy S3
By default, date and time in Samsung Galaxy SIII was provided automatically by the network you're using. Nevertheless, you can also set date and time on your phone manually to adjust it according to your current location.

In addition to set date manually, you can also change your date format to the format available on your phone. You can choose one of the date format you wish to use.

How to select date format?
Below are the steps you need to do to select date format:
Image result for Changing of  Date Format on Samsung Galaxy S3
  1. Go to Apps through Home screen.
  2. Scroll to Settings, then tap on it.
  3. Scroll to System section, then tap Date and time.
  4. Tap Select date format.
  5. Now you will see three options available on pop up menu, they are mm/dd/yyyy, dd/mm/yyyy and yyyy/mm/dd. As a note: dd refers to date, mm refers to month and yyyy refers to year.
  6. Tap the desired date format you wish to use. When the dot indicator next to the option shows green means the option is selected.
  7. Tap Home button to return to the standby mode.
Sometimes, some countries use the different date format with the default. By knowing on how to select date format, then you can change it to the format you always have to make you more easier to read it. So, which the format are you using now?

 Enable or Disable Text Message Delivery Report

 Image result for Enable or Disable Text Message Delivery Report
The best way to find out what options you can customize is by going to its settings page. As when you wants to customize your message, then you can go to Messaging app setting page and customize options available there to suit your need, such as set text template, change background style, use the Volume key to change text size, etc

While you're on Messaging app settings page, another option that you should see here is delivery report. Enabling this option will make your phone to request a delivery report for each message you send.

How to turn on or off text message delivery report?
Here are the steps you need to do to turn on or turn off this option:
  1. Go to Apps through Home screen.
  2. Tap Messaging.
  3. Tap the Menu key.
  4. On pop up menu select Settings.
  5. Scroll to Text message(SMS) settings section. Depending on your current settings, tap Delivery reports to enable or disable this option. When the checkbox next to this option is ticked means the option is turned on.
  6. Tap Home button to return to the standby mode.
Some peoples need to get the report for each outgoing message to make sure that the message has been successfully sent. If you're one of them, then you could consider to enable this option. While if not, you can leave it to off. So, have you turn this option on or off?

 Key Tap Vibration Enabling or Disabling

 Image result for Key Tap Sound Enabling  or Disabling on Samsung Galaxy S3
As another things on Samsung Galaxy SIII, you can also customize its keyboard to suit your needs. One of which is by turning on auto capitalization that will automatically capitalize the first letter of sentence or turning on key tap sound that will make your phone plays sound whenever you touch the keyboard.


One more thing you can do to customize the keyboard is by turning on key tap vibration. Enabling this option will make your phone vibrate when the keyboard is touched.

How to turn on or off key tap vibration?
Here are the steps you need to do to enable or disable this option:
Image result for Key Tap Sound Enabling  or Disabling on Samsung Galaxy S3
  1. Go to Apps through Home screen.
  2. Scroll to Settings, then tap on it.
  3. Tap Language and input.
  4. Make sure you've enable Samsung keyboard.
  5. Tap Settings (gear) icon next to Samsung keyboard option to enter to the settings page.
  6. Tap Advanced.
  7. Depending on your current setting, tap Key-tap vibration to turn on or turn off this option. When the checkbox next to this option is ticked means the option is turned on.
  8. Tap Home button to return to the standby mode.
This option indeed is not a really "useful" feature, but if you the one who wants to feel something different on your phone then you may need to turn on this option. While if you feel this option will be annoying you then turn off this option. So, did you've checked this option on your phone or not?

Showing Owner Information on Lock Screen setting 

 Image result for Key Tap Sound Enabling  or Disabling on Samsung Galaxy S3       Image result for Key Tap Sound Enabling  or Disabling on Samsung Galaxy S3
Setting a password or PIN to unlock your phone is one of the way that you can do in Samsung Galaxy SIII to avoid unauthorized people accessing your phone. This of course will help you to secure your data and any files you saved in this phone.

Another thing you can do associated with the lock screen is by setting and displaying owner information. This will useful if your phone was lost and somebody find it, then they will see your information on the lock screen. This information will make them more easier to find or call you to return your phone.

How to set and display owner information on lock screen?
To do so follow the steps listed below:
  1. Go to Settings.
  2. Tap Security.
  3. Tap Owner information.
  4. Here you can write the useful information, such as your name, alternative phone number which is can be use to call you or some reward you want to give them when they willing to return the phone, etc.
  5. Tick the checkbox next to Show owner info on lock screen option to display owner information on your lock screen.
  6. Tap OK button to save the change.
  7. Tap Home button to return to the standby mode.

Do you know, there are still a good people who find something lost and they willing to try to return it to the owner. Displaying the information on the lock screen will help them to more easier find or call you to return your lost phone. So, did you've set this option and displaying it on your lock screen?

Key Tap Sound Enabling  or Disabling on Samsung Galaxy S3

 Image result for Key Tap Sound Enabling  or Disabling on Samsung Galaxy S3
The most fun thing you can do with the Samsung Galaxy SIII is personalize it to suit your needs. One of which is by setting the virtual keyboard to automatically capitalize the first letter of sentence. This of course will useful to help you write correctly.

In the same settings page, you can also turn on or off key tap sound option. Enabling this option will make your phone plays sound when the keyboard is touched.

How to turn on or off key tap sound?
Follow the steps listed below to enable or disable this option:
  1. Go to Settings.
  2. Tap Language and input.
  3. Ensure you've enable Samsung keyboard.
  4. Tap Gear icon next to Samsung keyboard option to enter to the settings page.
  5. Tap Advanced.
  6. Depending on your current settings, tap Key tap sound option to turn on or off this option. When the checkbox next to this option is ticked means the option is turned on.
  7. Tap Home button to return to the standby mode.
For some peoples this option sometimes is annoying, but some others are not. If you don't want to hear sound whenever you touch the keyboard then turn this option off to set key tones to silent. While if you enjoy hearing the tone whenever you touch the keyboard then turn this option on. So, have you enabling this option on your phone or not?

Camera Timer settings in Samsung Galaxy S3

 Image result for Camera Timer settings in Samsung Galaxy S3
There is flash option available on Galaxy SIII camera to help it get a good lighting. You can adjust this option according to the environment intensity light to get a better picture.

One more of a useful option available on this camera is timer. This option will allow you to set count down timer before the picture is taken. This of course will useful if you want to take group picture where you want to be part of it or to take self portrait. Timer will let the camera count down for some time so you will have the time to get into the position.


How to change camera timer option?
There are four options of camera timer available that you can choose according to your needs. Below are the steps to change the camera timer:
  1. Go to Apps through Home screen.
  2. Tap Camera.
  3. Tap Settings (gear) icon to enter the settings option.
  4. Tap Timer.
  5. Now you will see four options available. They are:
    • Off: Choose this option if you don't want to use timer.
    • 2 sec: Choose this option if you want to let the camera count down for 2 seconds before the picture is taken.
    • 5 sec: Choose this option if you want to let the camera count down for 5 seconds before the picture is taken.
    • 10 sec: Choose this option if you want to let the camera count down for 10 seconds before the picture is taken.
  6. Tap the required timer option you wish to use. When the dot indicator next to the option shows green means the option is selected.
  7. Tap Home button to return to the standby mode.

By knowing on how to set camera timer, now you can set it according to your needs. Choosing timer also will help the camera to reduce handshake. So, have you ever used timer when you taking a picture?

 Turning  On or Off Camera Flash

 Image result for Turning  On or Off Camera Flash
Camera on Samsung Galaxy SIII has equipped with several shot modes which will allow you to get a better pictures, such as beauty shot mode which will allow the camera to remove facial imperfection in a photo or burst shot mode which will allow you to take up to 20 continuous pictures, etc.

Another feature which you can find in this camera is flash option. By using flash when taking a picture will help the camera to get enough lighting when the light intensity around less.


How to change camera flash option?
There are three options available associated with flash that you can choose by following the steps listed below:
  1. Go to Apps through Home screen.
  2. Tap Camera.
  3. Drag the indicator to the camera icon when the video recorded is turned on.
  4. Depending on your current settings, tap Flash icon to turn off the flash, turn on the flash or using auto flash.
  5. Or tap Setting (gear) icon to enter the settings page.
  6. Tap Flash.
  7. Now you will see three options on pop up menu. They are:
    • Off: Choose this option if you want to turn off the flash.
    • On: Choose this option if you want to turn on the flash.
    • Auto flash: Choose this option to let the camera decide whether to use flash or not.
  8. Tap to the required flash option you wish to use.
  9. Tap Home button to return to the standby mode.

By knowing on how to select flash option available on Galaxy SIII camera, now you can choose the one that best suit you. When the environment has less light intensity, then you can turn this option on.  While if it has enough, then you can turn it off. Or let the camera to decide whether to flash or not by selecting auto flash option.
Enable and disable of Capitalization Auto Keyboard Settings in Samsung Galaxy S3
 Image result for Enable and disable of Capitalization Auto Keyboard Settings in Samsung Galaxy S3    Image result for Enable and disable of Capitalization Auto Keyboard Settings in Samsung Galaxy S3
Most of Samsung Galaxy SIII users usually utilizing virtual keyboard to help them while writing an email or message. This keyboard has similar function as on keyboard on personal computer, such as typing capital letter, typing a number, enter symbol, etc.

In addition to use the keyboard to make you easier when compose a message, you can also customize keyboard's settings. One of which is by setting auto capitalization on or off. If you enable this option then it will automatically capitalize the first letter of the sentence.


How to turn on or off auto capitalization?
To do so kindly follow the steps listed below:
  1. Go to Apps through Home screen.
  2. Scroll to Settings, then tap on it.
  3. Tap Language and input.
  4. Make sure you've enable Samsung keyboard. When the checkbox next to this option is ticked means the option is turned on.
  5. Tap Gear icon next to Samsung keyboard option to enter the settings page.
  6. Tap Advanced.
  7. Depending on your current settings, tap Auto capitalisation to enable or disable this option. When the checkbox next to this option is ticked means the option is turned on.
  8. Tap Home button to return to the standby mode.

Enabling auto capitalization will help you to write correctly due to this option will capitalize the first letter of sentence automatically, even when the caps lock key is turned off. So, have you enabling this  option on your keyboard settings or not? Were you helped with this option? 

How to set Repeating of  Message Alert

One of the best way to notify you that you receive an incoming message is by setting a message tone. Fortunately, in Samsung Galaxy SIII you can change message tone to the one you like with ease. To enable you to change message tone in this phone, then first you must enabling notifications option in Messaging app settings page.

Another things you can do in this page which is associated with message tone is adjusting text message alert repetition. Here you can set it to ring just once or more than once.


How to adjust message alert repetition?
Kindly follow the steps listed below to do so:
  1. Go to Apps through Home screen.
  2. Tap Messaging.
  3. Tap the Menu key.
  4. On pop up menu select Settings.
  5. Scroll to Notification settings section then tap Message alert repetition.
  6. Here you can see three options available on pop up menu. They are:
    • Once: Choose this option if you want your phone ring the tone just once when receiving an incoming messages.
    • Every 2 minutes: Choose this option if you want your phone ring the tone every 2 minutes until you open the message.
    • every 10 minutes: Choose this option if you want your phone ring the tone every 10 minutes until you open the message.
  7. Tap the required message alert repetition option you wish to use. When the dot indicator next to the option shows green means the option is selected.
  8. Tap Home button to return to the standby mode.
By adjusting message alert repetition just once or more than once, now your phone will notify you when receiving new message and repeating the tone according to the settings you've just done. So, what's the option you use on your phone?