Showing posts with label iPhones. Show all posts

Thursday, July 28, 2016

Access & View All Selfies Taken on iPhone Camera

Image result for Access & View All Selfies Taken on iPhone Camera

If you take a lot of selfies with the iPhone you’ll be pleased to know that you can quickly access every selfie ever taken with the front facing iPhone camera by using a simple sorting album in the iPhone Photos app. Likewise, if you just want to see all the selfies taken by someone else, you can quickly access every selfie taken with the iPhone camera by using the same selfie album on their phone.

This is often overlooked, but it’s a really simple trick to use. All it requires is the iPhone have at least a modern version of iOS like 9 or later installed on the device, as prior versions don’t have the Selfies photo sorting album option. And of course the iPhone must have some selfies, since the iPhone is smart enough to determine what photos were taken with the front camera versus the rear camera.

How to See All Selfies Taken with iPhone Camera

 Image result for How to See All Selfies Taken with iPhone Camera
Ready to see every selfie taken with the iPhone camera on a device? Here’s all you need to do:
  1. Open the Photos app as usual but tap on the “Albums” button
  2. From the “Albums” view (tap back to Albums if you’re in Camera Roll), scroll down to find the “Selfies” album, tap on that to show a picture album of every picture taken with a front facing camera that is stored on the iPhone
This album will also include other selfies taken by other iPhone users who have shared the picture with the current iPhone, assuming the picture has been saved locally to the device.
While this is a popular feature for people who take many pictures of themselves and like to share them through iMessage or the various social media channels, it’s also quite popular with parents and educators for other reasons.
The Selfies album isn’t using facial recognition or anything too crazy to recognize people or faces, it simply includes every picture taken with the iPhone front facing camera, thus even if you aren’t taking pictures of yourself with that camera, you’ll find whatever used the front camera to snap the shot. Likewise, if you’re taking group pictures with the Self Timer camera you wouldn’t find these available in the selfies album either (unless they also used the front facing camera and the self timer feature, anyway).
There are other album sorting options in iOS as well, allowing users to see burst shots, panoramas, screenshots, or to show only videos taken with the camera too.

How to Reset Notes Password in iOS

 Image result for How to Reset Notes Password in iOS
Many users are password protecting Notes on iPhone and iPad, which offers a secondary security layer for especially personal or private data stored within the Notes app. Because the Notes app uses a different password from the general password used on the iOS Lock Screen, and different from the password used by an Apple ID or iCloud account, it can be easy to see how that Notes password may be forgotten or lost. In such a situation, you may wish to reset the Notes app password in iOS, which allows you to set a new password for notes.
Keep in mind that while you can reset a Notes app password, it will not reset or unlock any previously password protected notes within Notes app, as any previously protected notes will retain the old password unless it is changed or removed. However, resetting the Notes password will allow you to protect future notes with the new password. This could theoretically lead to a situation where different notes have different passwords, which is why some situations may call to change the Notes password rather than reset it, or to update the old password to the new password.

How to Reset Notes Password in iOS

Resetting the Notes password will set a new password for future notes being protected within Notes app. Remember, resetting a Notes password does not remove or change a password that is already set and locked. If you wish to remove a password from a note, enter the password first and unlock the note, then continue forward with the reset process. Here is how to reset the password for Notes app on any iPhone, iPad, or iPod touch:
  1. Open the “Settings” app from the Home Screen of iOS
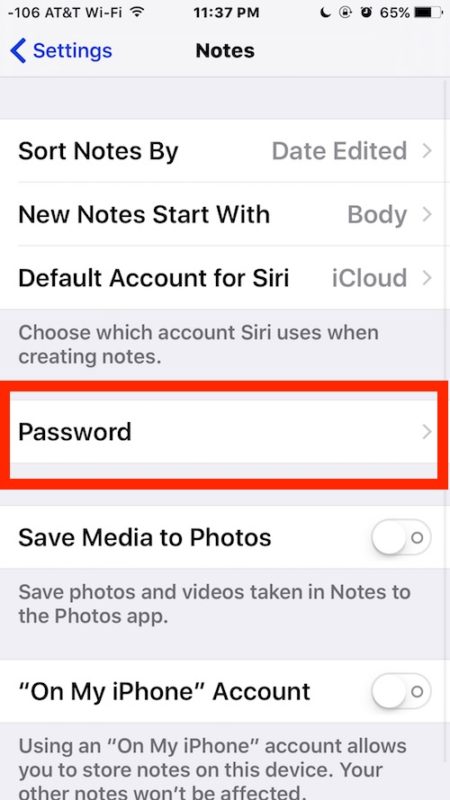
  2. Go to the “Notes” section and tap on that
  3. resetting a Notes password in iOS
  4. Tap on “Password”
  5. Reset Notes password iOS
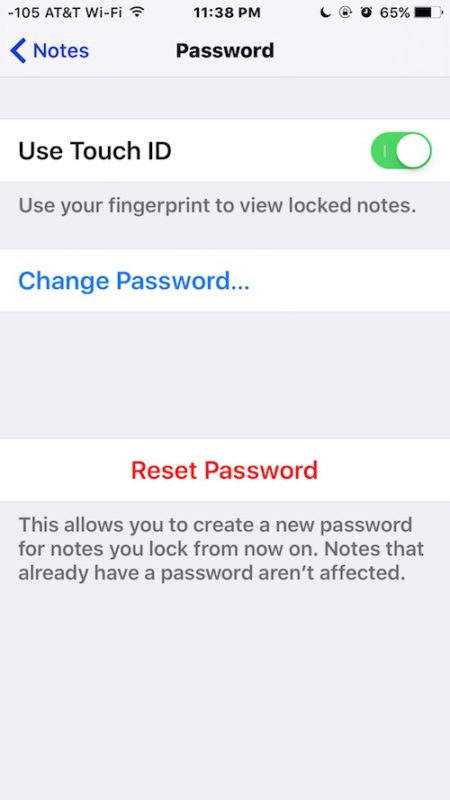
  6. Choose “Reset Password” to reset the password for all notes including Notes on the Mac
  7. How to Reset Notes password in iOS
  8. Confirm the new password and set a hint (recommended)
Once the password is reset, any newly protected notes within Notes app will use the newly set password.
Keep in mind that if you use iCloud Notes or iCloud Keychain, the newly reset password will carry forward to Notes on any related iPhone, iPad, iPod touch, or Mac devices.
As we’ve mentioned several times but is worth repeating yet again, resetting a Notes password does not remove a previously set password on a note. To remove a password on a previously locked note, one must unlock the note by entering the correct password, then either change the password, or go through the aforementioned reset process to set the password to a new password. There is no method of removing a password from a note without knowing the proper password, which is why leaving a good password hint is important.

Turning Off Keyboard Click Sounds on iPhone & iPad

Turning Off Keyboard Click Sounds on iPhone & iPad

 Image result for How to Turn Off Keyboard Click Sounds on iPhone & iPadImage result for How to Turn Off Keyboard Click Sounds on iPhone & iPad

A little clicking sound is made every time you type on the iPhone keyboard. Some users really like that sound effect and find that it helps them to type on the virtual keyboard easier, but other users find it to be annoying and obtrusive. If you don’t want to hear the clicky sound effects when typing in iOS, you can quickly turn the feature off and have the key taps stay quiet, leaving you with completely silent hitting any keys on the iPhone keyboard.  

Disabling the key click sound effects can be done permanently through a settings change, or if you just want to be quiet for a short while, say when typing in a coffee house or library, you can use a broader mute option too.

Turn Off Keyboard Click Sound Effects in iOS Completely

 Image result for How to Turn Off Keyboard Click Sounds on iPhone & iPadImage result for How to Turn Off Keyboard Click Sounds on iPhone & iPad
This works to disable the keyboard click sounds on any iPhone, iPad, or iPod touch. The setting option is available in virtually every version of iOS and is always located in the same place:
  1. Open the “Settings” app on your iPhone or iPad and choose “Sounds”
  2. Scroll all the way to to the bottom and find “Keyboard Clicks”, flip that switch to the OFF position
  3. Exit out of Settings
The change is instant. You can go to any app in iOS that you would type and normally hear the click sounds, you’ll find them to be nonexistent and you are no longer announcing to the surrounding vicinity that you are typing on an iOS keyboard.
Of course going back into the Settings > Sound and toggling the Keyboard Clicks switch back ON will make the click on tap sounds appear again. 

Temporarily Turn Off Keyboard Click Sounds with Mute

 Image result for Temporarily Turn Off Keyboard Click Sounds with Mute
For iPhone users who generally like the keyboard click sounds, another option is to just temporarily turn off the key clicking sounds by using the devices Mute button. Just flip the mute switch while typing and the clicking sounds won’t be heard, of course neither will anything else when Mute is on, however, which is why this is just a temporary measure.
The keyboard sound effects are often loved or hated, many people find them a nuisance which is why we’ve mentioned it in the annoying iPhone settings that can be fixed as well as resolving some iOS 8 frustrations (particularly since some users discovered the sound effects were turned back on after updating iOS to the latest version, even if it was turned off before). Ultimately, whether you want your typing to make sounds or not is a matter of preference and opinion. Me personally, I like the iOS key click sounds, but I’ve always liked clicky keyboards in general, particularly on desktop computers. The clickier and louder the clicks the better, just some weird reward system stemming from the gloriously clicky Apple Extended Keyboard II from yesteryear, I suppose.

Thursday, April 7, 2016

Battery percentage in Samsung Galaxy s5

Battery percentage in Samsung Galaxy s5

 Image result for Battery percentage in Samsung Galaxy s5
You may need to know your battery status to make sure that it has enough power and won't run out so that you can continue using your phone. To help you know your battery level with ease, aside from providing you with the default battery icon, Samsung Galaxy S5 also provides you with a feature that will let you to display the battery percentage on the status bar so that you can easily and quickly know your battery level. I myself always keep this feature on since it's easier for me to know how much the battery left is by reading the percentage than seeing the battery icon.


How to display the battery percentage on the status bar?
There are two different methods that can be used to turn on the option to display battery percentage on the status bar: from the settings menu and from the S Finder.

Method #1: From the settings menu
You can enable the option to display the battery percentage from the general settings menu by using the following steps:
  1. On any screen, swipe down the top of the screen to open up the notification panel and then tap to go to the settings menu.
  2. With the settings menu is displayed in grid view, scroll down to the System section and then tap Battery .
  3. Check the box next to Display battery percentage to enable it.
  4. The battery percentage will be displayed beside the battery icon on the status bar.

Method #2: From the S Finder
You can enable the option to display the battery percentage from the S Finder by using the following steps:
  1. On any screen, swipe down the top of the screen to open up the notification panel and then tap the S Finder button.
  2. Key in "display battery percentage" in the search field and the tap to start searching.
  3. In the search result page under the Settings section, check the box next to Display battery percentage to enable it.
  4. The battery percentage will be displayed beside the battery icon on the status bar.

 Image result for Enabling Auto Screen Off During Calls in Samsung Galaxy S4Image result for Enabling Auto Screen Off During Calls in Samsung Galaxy S4

Enabling Auto Screen Off During Calls in Samsung Galaxy S4

During calls, you can set your phone to turn off the screen automatically to avoid your face/ear from accidentally touching something in the screen as well as to help you conserve more battery. You can do so by enabling the proximity sensor during calls so that the screen will be turned off if the sensor detects the presence of nearby objects or if there's an object near the screen such as the user's ear during calls. The proximity sensor is located between the earpiece and the front-facing camera at the top of the phone.


How to enable auto screen off during calls?
There are two different methods that can be used to access the option to set your phone to turn off the screen during calls: from the Phone app settings and from the general settings menu.


Method #1: From the Phone app settings
You can turn on the proximity sensor during calls from the Phone app settings by using the following steps:
  1. Open Phone app.
  2. Tap the Menu key and then select Call settings.
  3. Check the box next to Turn off screen during calls to enable it.
  4. The auto screen off during calls feature has been enabled.


Method #2: From the settings menu
You can turn on the proximity sensor during calls from the general settings menu by using the following steps:
  1. On home screen, tap the Menu key and then select Settings to go to the general settings menu.
  2. Tap My device tab.
  3. Tap Call.
  4. Check the box next to Turn off screen during calls to enable it.
  5. The auto screen off during calls feature has been enabled.

 Enabling Auto Adjust Screen Tone in Samsung Galaxy S5


Samsung Galaxy S5 has some power saver options, one of which is the auto adjust screen tone. When this option is enabled, your phone will automatically adjust the screen tone based on the light and the analysis of the on-screen images. You may see the difference of the screen tone when you jump between a colourful page to a page or an app that has a lot of white space, for instance when you jump from the home screen to the Internet app to access the Google search page, you'll probably notice that the page is dimmed slightly. Since a brighter screen consumes more battery then dimming the screen will help you to conserve more battery.


How to turn on the auto adjust screen tone?
You can access the option to enable the auto adjust screen tone by using two different methods: from the general settings menu and from the S Finder.


Method #1: From the settings menu
You can turn on the auto adjust screen tone via the general settings menu by using the following steps:
Image result for Enabling Auto Adjust Screen Tone in Samsung Galaxy S5
  1. On any screen, swipe down the top of the screen to open up the notification panel and then tap to go to the settings menu.
  2. With the settings menu is displayed in grid view, scroll down to the Sound and display section and then tap Display .
  3. Check the box next to Auto adjust screen tone to enable this option.
  4. The auto adjust screen tone has been enabled.

Method #2: From the S Finder
You can turn on the auto adjust screen tone via the S Finder by using the following steps:
    Image result for Enabling Auto Adjust Screen Tone in Samsung Galaxy S5
  1. On any screen, swipe down the top of the screen to open up the notification panel and then tap the S Finder button.
  2. Key in "auto adjust screen tone" in the search field and then tap to start searching.
  3. In the search result page, under the Settings section, check the box next to Auto adjust screen tone to enable this option.
  4. The auto adjust screen tone has been enabled.
Enabling Negative Colour Mode in Samsung Galaxy S5
 Image result for How to Enabling Negative Colour Mode in Samsung Galaxy S5
Negative colours is a feature available in Samsung Galaxy S5 that will allow you to reverse the screen colour so that the screen visibility can be improved and the text on the screen can be easily recognized. When the negative colour mode is enabled, the screen will look like a negative film and the text will be displayed white on black instead of black on white. The inverted screen colour will not only make it easier for your eyes, but also be able to help you conserve the battery.


How to enable the negative colour mode?
In this post, we'll try reversing the screen colour by enabling the negative colour mode using two different methods: from the settings menu and from the direct access option.


Method #1: From the settings menu
You can enable the negative colour mode from the general settings menu by using the following steps:
  1. On any screen, swipe down the top of the screen to open up the notification panel and then tap to go to the settings menu.
  2. With the settings menu is displayed in grid view, scroll down to the Personalisation section and then tap Accessibility .
  3. Tap Vision.
  4. Scroll the screen to the bottom and then check the box next to Negative colours to enable the negative colour mode.
  5. Now, the screen colour will be reversed to the negative colour.
Method #2: From the direct access option
This method can be used if you have enabled the negative colours option within the direct access feature. Well, you can use the following steps to enable the negative colour mode from the direct access option:
  1. On any screen, press the Home key three times quickly to view the direct access option.
  2. Tap Negative colours to enable the negative colour mode.
  3. Now, the screen colour will be reversed to the negative colour.
Adjusting of  Screen Timeout in Samsung Galaxy S5 
 Image result for Adjusting of  Screen Timeout in Samsung Galaxy S5
Samsung Galaxy S5 has some features that have been designed to help you save more battery, one of which is the screen timeout feature that will allow you to set the length of the idle time that should be waited by the device before turning off the screen backlight, in other words, the device will turn off the screen backlight if you don't use your phone until the specified screen timeout is over. The screen timeout can be adjusted from 15 seconds to 10 minutes.

How to adjust the screen timeout?
You can do so by using the following steps:
  1. On any screen, swipe down the top of the screen to open up the notification panel and then tap to go to the settings menu.
  2. With the settings menu is displayed in grid view, scroll down to the Sound and display section and then tap Display .
  3. Tap Screen timeout and then select from the following options:
    • 15 seconds
    • 30 seconds
    • 1 minute
    • 2 minutes
    • 5 minutes
    • 10 minutes
  4. The screen timeout has been adjusted.
As a note, if you're tight with battery life issue, you'd better to set the screen timeout to a shorter period since it'll help you to save power as the battery doesn't have to keep the screen backlight on for longer time, unless you're using the smart stay feature then you'd better to set the screen timeout for a longer period.

Adjusting of  Screen Brightness in Samsung Galaxy S5

 Image result for Adjusting of  Screen Brightness in Samsung Galaxy S5
In certain condition, you will probably need to adjust the screen brightness of your Samsung Galaxy S5, for instance you may need to increase it when you're in a brighter environment or decrease it when you're in a darker environment. You can manually adjust the screen brightness or let the phone to self-adjust the screen brightness using its sensor.

How to adjust the screen brightness?
Generally, there are two methods available that can be used to adjust the screen brightness: from the notification panel and from the settings menu.


Method #1: From the Notification panel
  1. On any screen, swipe down the top of the screen to open up the notification panel.
  2. By default, the screen brightness adjustment bar is located below the S Finder and Quick connect buttons. If it's not there, you have to enable it first by using the following steps:
    • Tap to go to the settings menu.
    • With the settings menu is displayed in grid view, scroll down to the Sound and display section and then tap Notification panel .
    • Make sure to check the box next to Brightness adjustment to display the screen brightness adjustment bar in the notification panel.
  3. Depending on your current settings, tap the Auto checkbox to enable or disable Automatic brightness. When the Auto checkbox is checked means the automatic brightness is enabled and the phone will be able to automatically adjust the screen brightness using its sensor.
  4. To adjust the screen brightness manually, tap and slide the bar to the left for a darker screen, or tap and slide the bar to the right for a brighter screen.


Method #2: From the settings menu
  1. On any screen, swipe down the top of the screen to open up the notification panel and then tap to go to the settings menu.
  2. With the settings menu is displayed in grid view, scroll down to the Sound and display section and then tap Display .
  3. Tap Brightness.
  4. Depending on your current settings, tap Automatic brightness to enable or disable it. When the checkbox in the left side of this option is checked means the automatic brightness is enabled and the phone will be able to automatically adjust the brightness using its sensor.
  5. To adjust the screen brightness manually, tap and slide the bar to the left for a darker screen, or tap and slide the bar to the right for a brighter screen.
  6. Tap OK button to save the changes.